How to Update SBI KYC Online?

SBI KYC Update Online
Updating your KYC (Know Your Customer) details in the YONO SBI app is a quick and hassle-free process, ensuring that your banking records are always up to date. With just a few simple steps, you can upload your documents and complete the KYC update online, saving time and avoiding the need to visit a branch.
Table of Content
- Update Kyc in Sbi via Mobile App
- Update Kyc in Sbi via Internet Banking
- Update Email ID in SBI
- Link Aadhar in Sbi
- SBI Pan Card Link Online
- Impotant FAQs
Method 1: Using Mobile App
- Open the SBI Yono App: Ensure that you have the latest version of the SBI Yono app installed on your smartphone.
- Login: Login to your Yono app using your credentials, such as username and password.
- Navigate to the KYC Section: Look for a section in the app related to KYC or profile settings. This could be in the "Profile" or "Settings" menu.
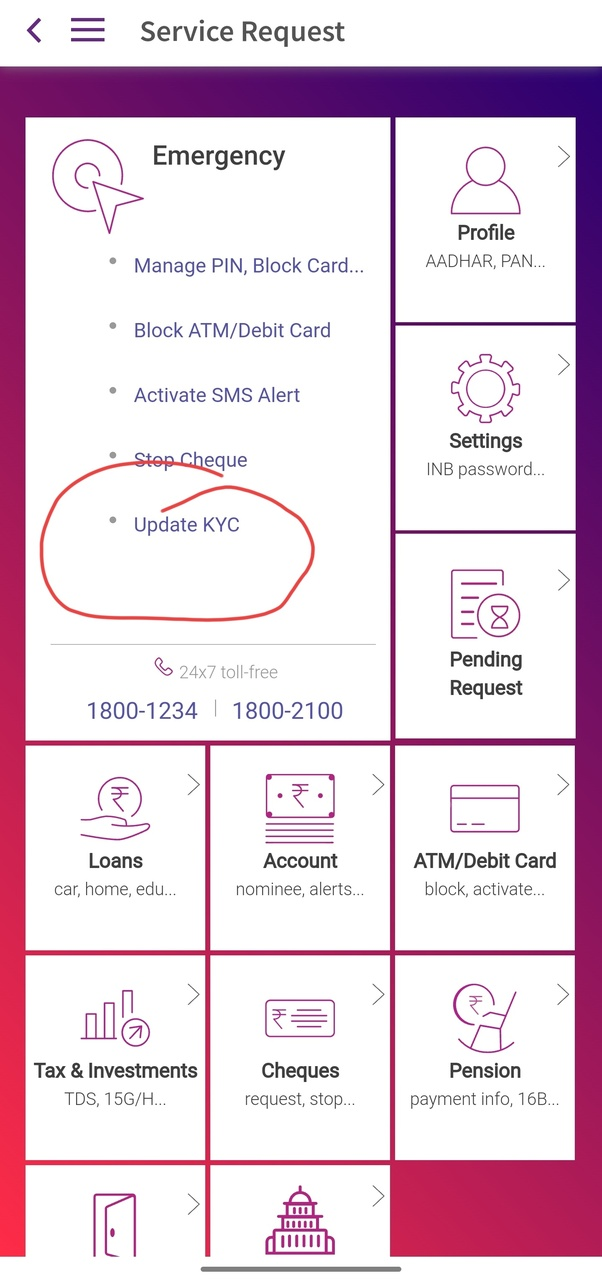
- Update KYC Details: Once in the KYC section, you may find an option to update or verify your KYC details. Select this option.
- Provide/Verify Information: Follow the on-screen instructions to provide or verify the required information. This might include personal details, contact information, and documents like an Aadhaar card, PAN card, passport, etc.
- Document Upload (if required): If the KYC update involves document submission, the app may prompt you to upload the necessary documents. Make sure you have clear and valid copies of the required documents.
- Submit Information: Complete the submission process as instructed by the app. Ensure that all the required fields are filled correctly, and any uploaded documents meet the specified criteria.
- Visit Branch (if required): Depending on the KYC update process, you may be required to visit the nearest SBI branch for in-person verification. Check the app for guidance on whether this step is necessary.
- Confirmation: After submitting the KYC update, you should receive a confirmation message on the app. This may take some time to process.
- Check KYC Status: Some apps provide a feature to check the status of your KYC update. If available, use this feature to ensure that your KYC has been successfully updated.
Method 2: Using Internet Banking
- Log In to Internet Banking: Visit the official SBI Internet Banking portal and log in using your username and password.
- Navigate to 'My Accounts & Profile': Click on the ‘My Accounts & Profile’ tab.
- Select 'Update KYC': Choose the ‘Update KYC’ option.
- Enter Profile Password: Enter your profile password and click ‘Submit’.
- Select Account: Choose the account for which you want to update KYC details from the drop-down menu.
- Fill Out Information: Provide the updated information and upload the relevant documents.
- Enter OTP: You will receive an OTP on your registered mobile number. Enter the OTP to complete the update
How to Update Email ID in SBI?
Here's a step-by-step guide on how to update your email ID in the SBI YONO app:
- Open the SBI YONO App: Launch the YONO app on your mobile device and log in using your credentials.
- Navigate to 'Profile' or 'Settings': Tap on the menu icon (usually three horizontal lines) on the top left corner of the home screen and select ‘Profile’ or ‘Settings’.
- Select 'Update Email ID': Look for the option to update your email address and tap on it.
- Enter New Email ID: Enter your new email address and confirm it.
- Verify: You may be asked to verify your new email ID by entering an OTP (One Time Password) sent to your registered mobile number.
- Confirm Changes: Once verified, confirm the changes to save your new email ID.
SBI Aadhaar Link Online
Method 1: Using Internet Banking
- Log In to Internet Banking: Visit the official SBI Internet Banking portal and log in using your username and password.
- Navigate to 'My Accounts & Profile': Click on the ‘My Accounts & Profile’ tab.
- Select 'Update Aadhaar': Choose the ‘Update Aadhaar’ option.
- Enter Profile Password: Enter your profile password and click ‘Submit’.
- Select Account: Choose the account for which you want to update the Aadhaar details.
- Enter Aadhaar Number: Input your Aadhaar number and click on ‘Submit’.
- Verify: You will receive an OTP on your registered mobile number. Enter the OTP to complete the update1.
Method 2: Using the SBI YONO App
- Open the SBI YONO App: Launch the YONO app on your mobile device and log in using your credentials.
- Go to 'Service Request': Tap on the menu icon (usually three horizontal lines) on the top left corner of the home screen and select ‘Service Request’.
- Select 'Update Aadhaar': Choose the ‘Update Aadhaar’ option.
- Enter Aadhaar Number: Input your Aadhaar number and click ‘Submit’.
- Verify: You will receive an OTP on your registered mobile number. Enter the OTP to complete the update1.
Method 3: Via SMS
- Compose a Text Message: Open your SMS app and start a new message.
- Enter the Text: Type “LINK <space> AADHAAR <space> last four digits of your account number”.
- Send the Message: Send this text to 567676 from your registered mobile number.
- Receive Confirmation: You will receive a confirmation message regarding the Aadhaar linking status.
SBI Pan Card Link Online
Here's a step-by-step guide on how to link your PAN card with your SBI account online:
Method 1: Using Internet Banking
- Log In to Internet Banking: Visit the official SBI Internet Banking portal and log in using your username and password.
- Navigate to 'Profile-PAN Registration': Click on the ‘Profile-PAN Registration’ option under the 'My Accounts' section.
- Select Account Number: Choose the account number you want to link with your PAN.
- Enter PAN Number: Input your PAN number and click on ‘Submit’.
- Confirmation: Your request will be forwarded to the branch for processing, and you will receive a status update on your registered mobile number.
Method 2: Using the SBI YONO App
- Open the SBI YONO App: Launch the YONO app on your mobile device and log in using your credentials.
- Go to 'Service Request': Tap on the menu icon (usually three horizontal lines) on the top left corner of the home screen and select ‘Service Request’.
- Select 'Update PAN': Choose the ‘Update PAN’ option.
- Enter PAN Number: Input your PAN number and click ‘Submit’.
- Verify: You will receive an OTP on your registered mobile number. Enter the OTP to complete the update.
Method 3: SBI PAN Card link SMS
- Compose a Text Message: Open your SMS app and start a new message.
- Enter the Text: Type
UIDPAN <space> 12-digit Aadhaar number <space> 10-digit PAN. - Send the Message: Send this text to either 567678 or 56161 from your registered mobile number.
SBI will process your request and update your PAN card details in their system. Easy and efficient!
Tips for a Smooth Process
- Keep Documents Ready: Have your PAN card or e-PAN handy for verification.
- Check Details: Double-check the information you enter to ensure accuracy.
- Update Regularly: Regularly update your PAN details to avoid any disruptions in your banking services.
FAQs:
Can we update KYC online in SBI?
- Open the ONO App: Log in using your credentials.
- Go to 'Service Request': Tap on the menu icon and select ‘Service Request’.
- Select 'Update KYC': Choose the ‘Update KYC’ option.
- Fill Info & Upload Documents: Provide updated information and upload the necessary documents.
- Enter OTP: Enter the OTP sent to your registered mobile number.
Can I visit any SBI branch for a KYC update?
- Absolutely. Customers can update their KYC by visiting the nearest SBI branch. This in-person visit allows them to submit the necessary documents directly and ensure that all their details are correctly updated. Just remember to carry along your proof of identity and address.
How to check SBI KYC status online?
- Log In: Open the YONO app and log in with your credentials.
- Go to Account Details or 'Service Request': Navigate to your account details or the 'Service Request' section.
- Check KYC Status: Look for the KYC status. If it's not directly visible, raise a service request to confirm your KYC compliance.
What is the SMS number of SBI KYC?
To update your KYC via SMS:
- Compose a Text Message: Open your SMS app and start a new message.
- Enter the Text: Type “KYC Your Customer ID”.
- Send the Message: Send this text to 5676791 from your registered mobile number.
What is the email ID of the SBI card KYC?
- Simply write an email to [email protected] with the necessary details for any other updates or queries.
How can I update my email ID in SBI online?
- Log In to Internet Banking: Log in to your SBI Internet Banking account.
- Navigate to 'My Accounts': Go to the ‘My Accounts’ section.
- Go to 'Profile': Click on ‘Profile’ and then select ‘Personal Details’.
- Click 'Change Email ID': Choose the ‘Change Email ID’ option.
- Enter New Email ID: Enter your new email address.
- Submit: Click on 'Submit' to save the changes.
How can I register my email ID in SBI online?
Update Email ID via the YONO App:
- Open YONO App: Log in.
- Go to 'Service Request': Tap on the menu, and select ‘Service Request’.
- Select 'Update Email ID': Enter your new email ID, and confirm.
- Verify: Enter OTP sent to your registered mobile number.
- Submit: Save changes.
How can I update my PAN card online in SBI?
To link your PAN card through SBI's online portal:
- Visit the SBI Website: Go to www.onlinesbi.com and log in with your credentials.
- Navigate to 'Profile': Click on 'Profile' under the 'My Accounts & Profile' tab.
- Select 'PAN Registration': Click on the 'PAN registration' option to proceed.
How can I update my SBI, KYC, and PAN online?
- Log In: Access SBI online banking with your credentials.
- Go to 'My Accounts & Profile': Click on ‘Update KYC’.
- Select Account: Choose your SBI account and click ‘Next’.
- Upload Documents: Upload the supporting documents on the next page.
Can I update my PAN in SBI online?
- Visit SBI Website: Go to the official SBI website.
- Log In: Enter your customer ID and password to log in.
- Navigate to Profile-PAN Registration: On the homepage, click 'Profile-PAN Registration' under the 'My Accounts' section on the left panel.
We hope that you like this content and for more such content Please follow us on our social site and YouTube and subscribe to our website.
Manage your business cash flows and payable/receivables using our Bahi Khata App


Comments ()